KAILOS Start
Use KAILOS, Make your indoor map
KAILOS System Architecture
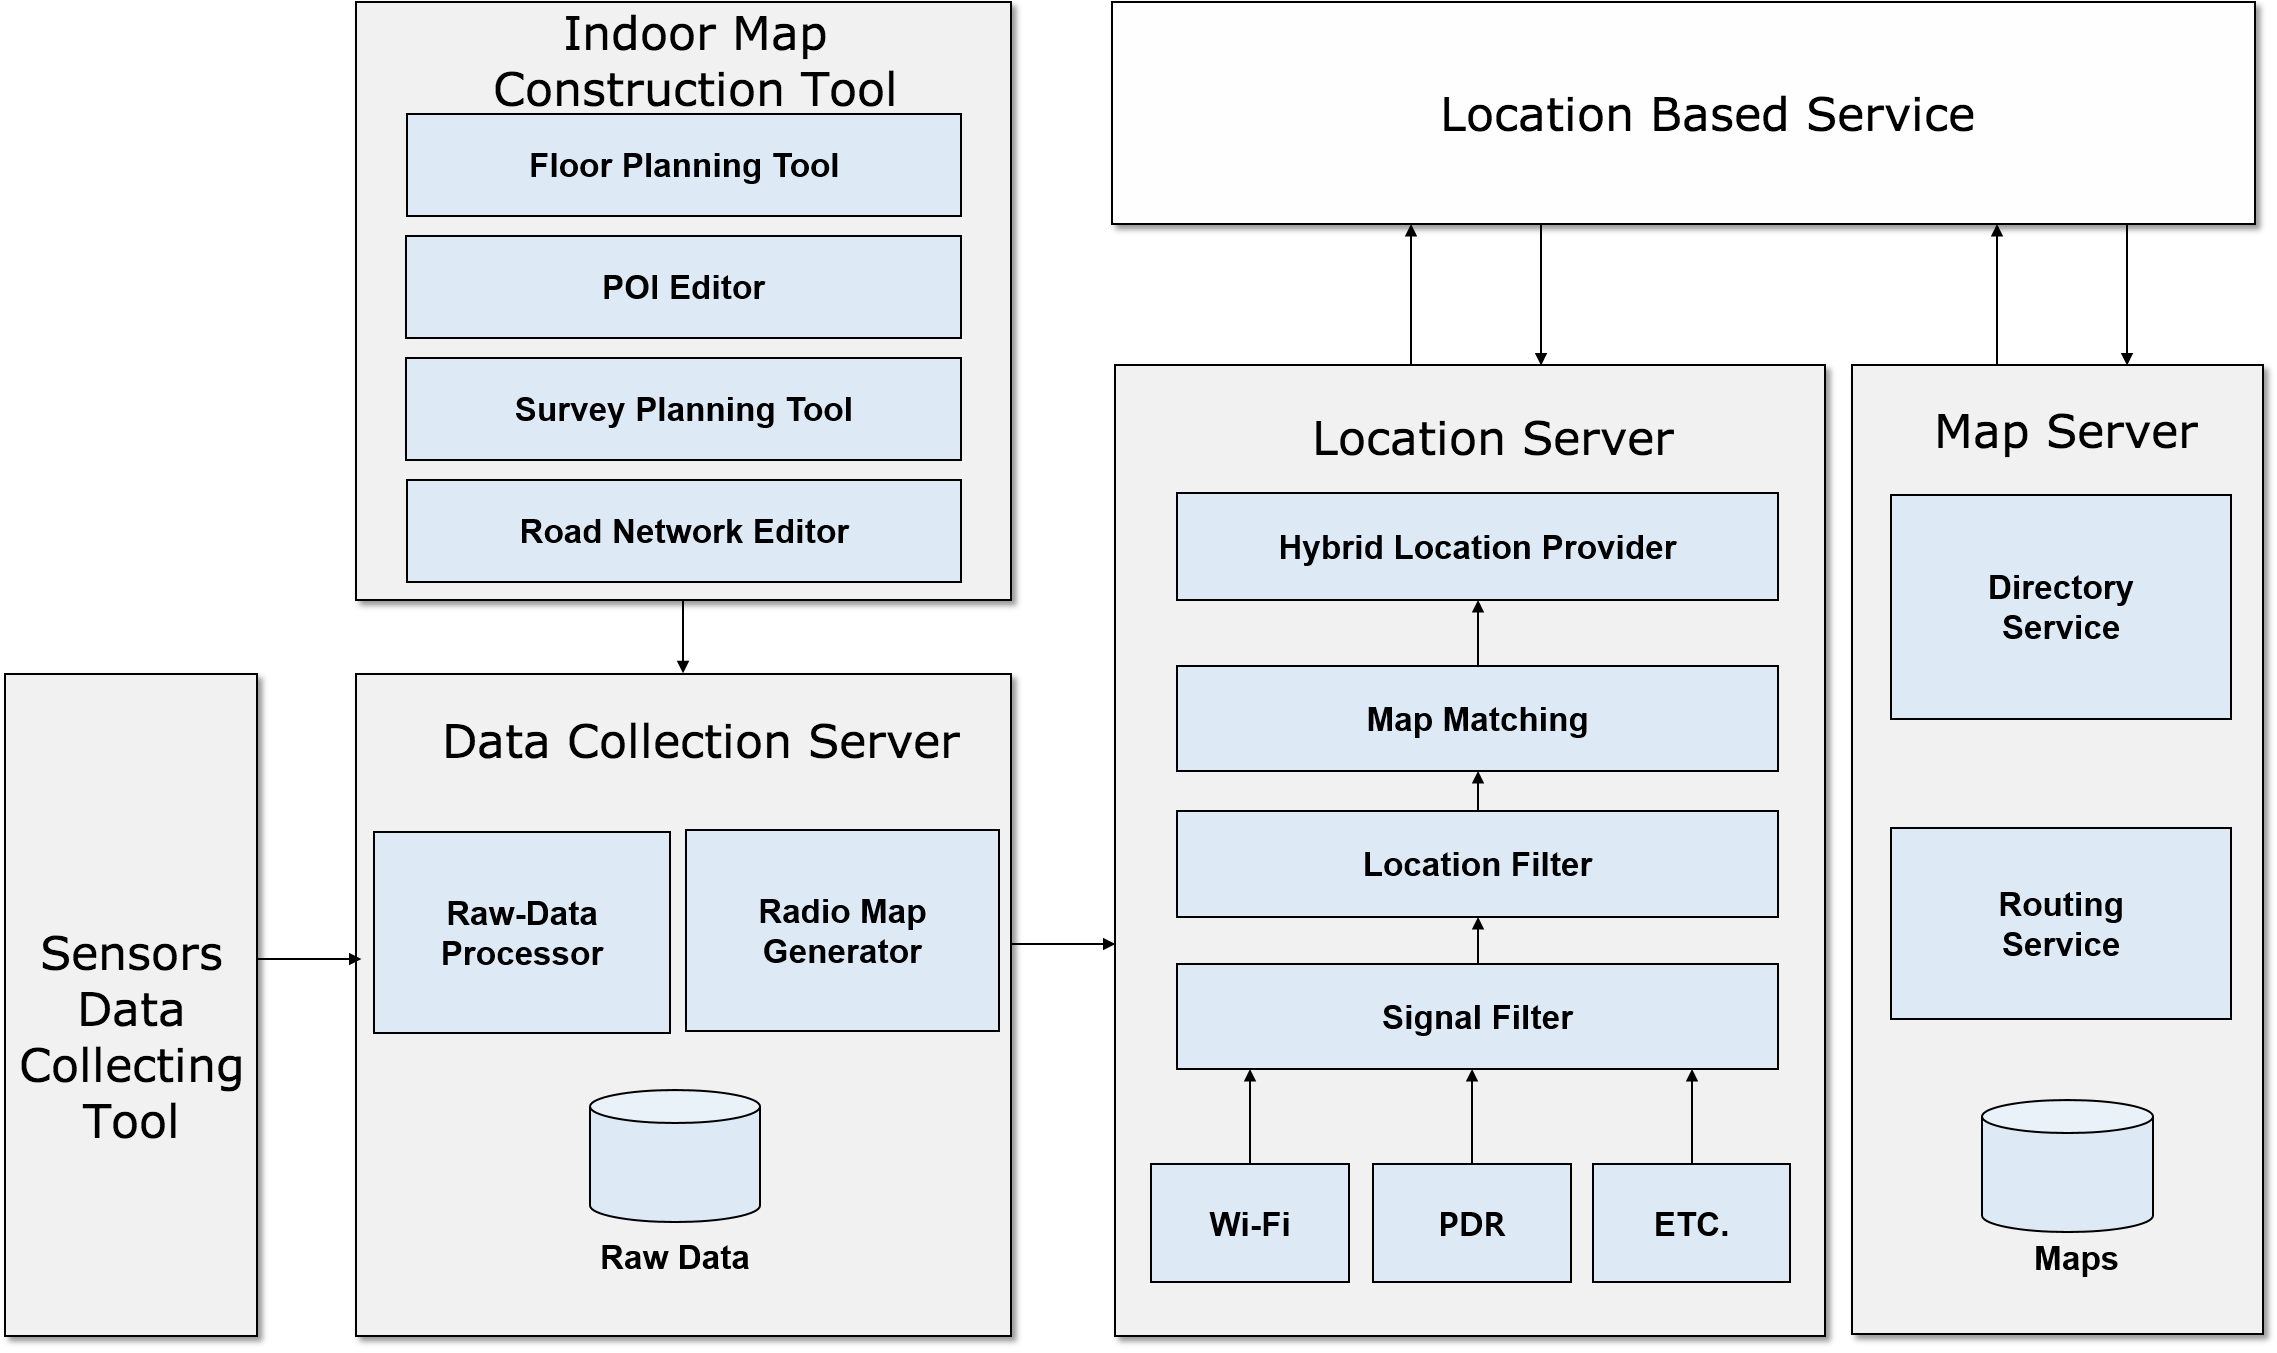
KAILOS Indoor GPS system combines indoor map construction tool, data collection tool, data server, location server and map server into a single system to provide a convenient development environment for location-based services.
The KAILOS system operates on server-side environments to simplify the use and maintenance of the system, which is mainly aimed at developing light-weighted location-based services.
STEP1: Radio Map Construction
In order to construct an indoor map of a certain floor or a building, a radio map of the area should be constructed in advance. The construction of the radio map can be completed by following the detailed steps below.

Web-based Map Construction Tool
Web-based Map Construction Tool

The web-based map construction tool is currently available at our site.
Minimum Specification for KAILO Indoor GPS System
- Computers or mobile devices with the internet access
- Internet browser supporting HTML5 Canvas and standard java scripting
- !!Currently, Google Chrome browser is only recommended for the stable use of KAILOS system.
Adding Buildings
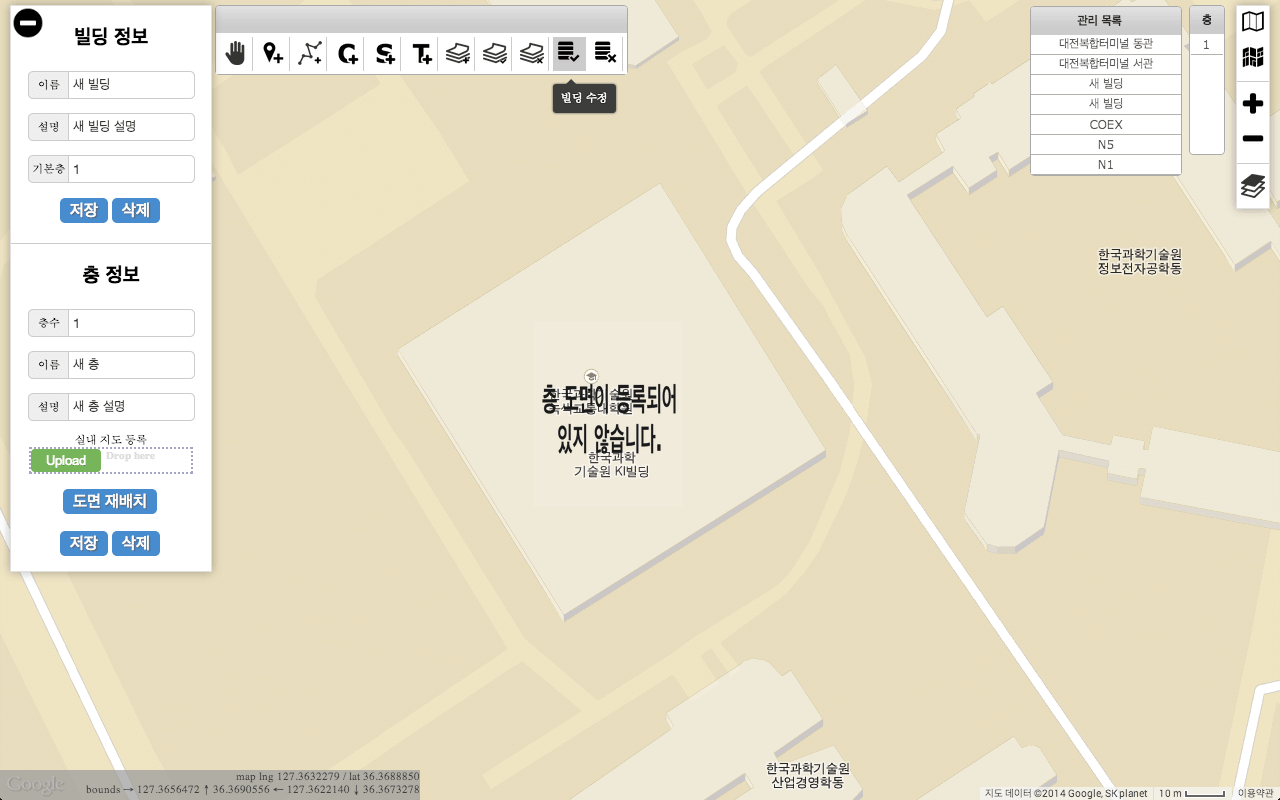
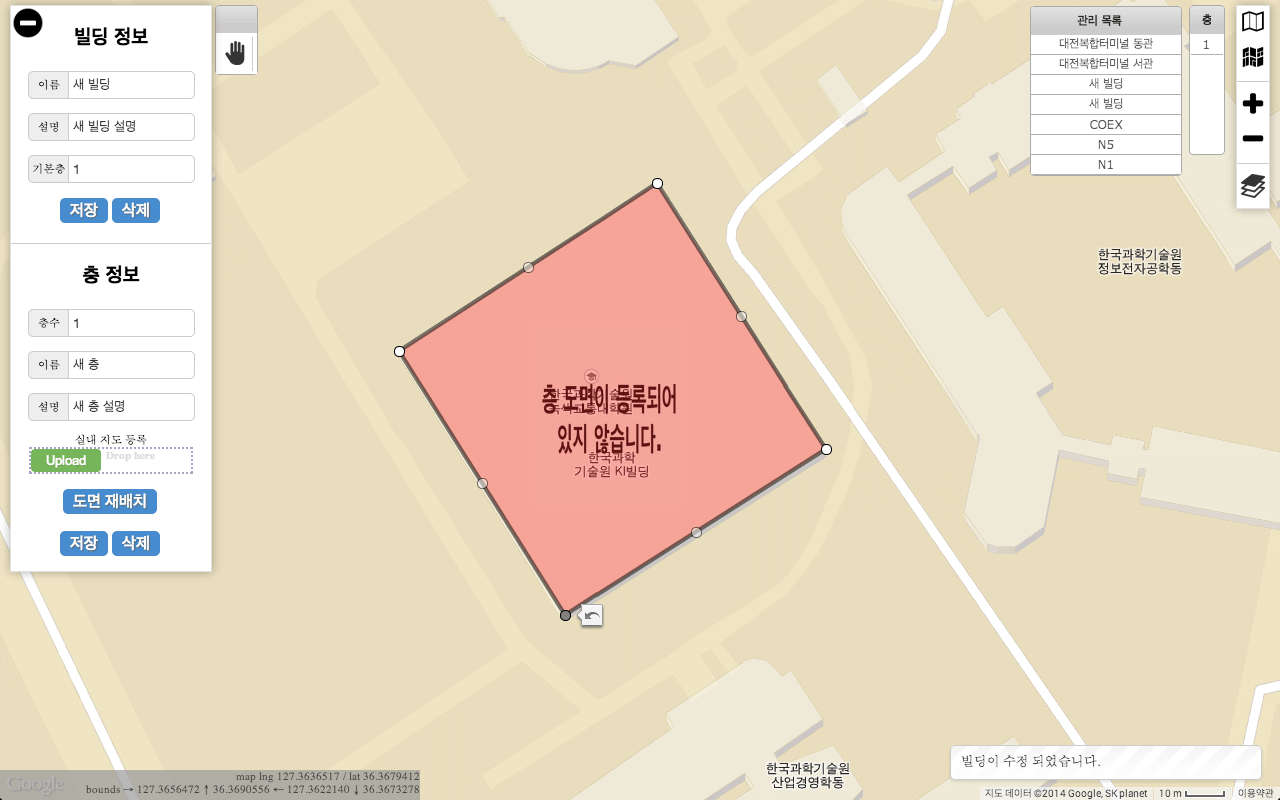
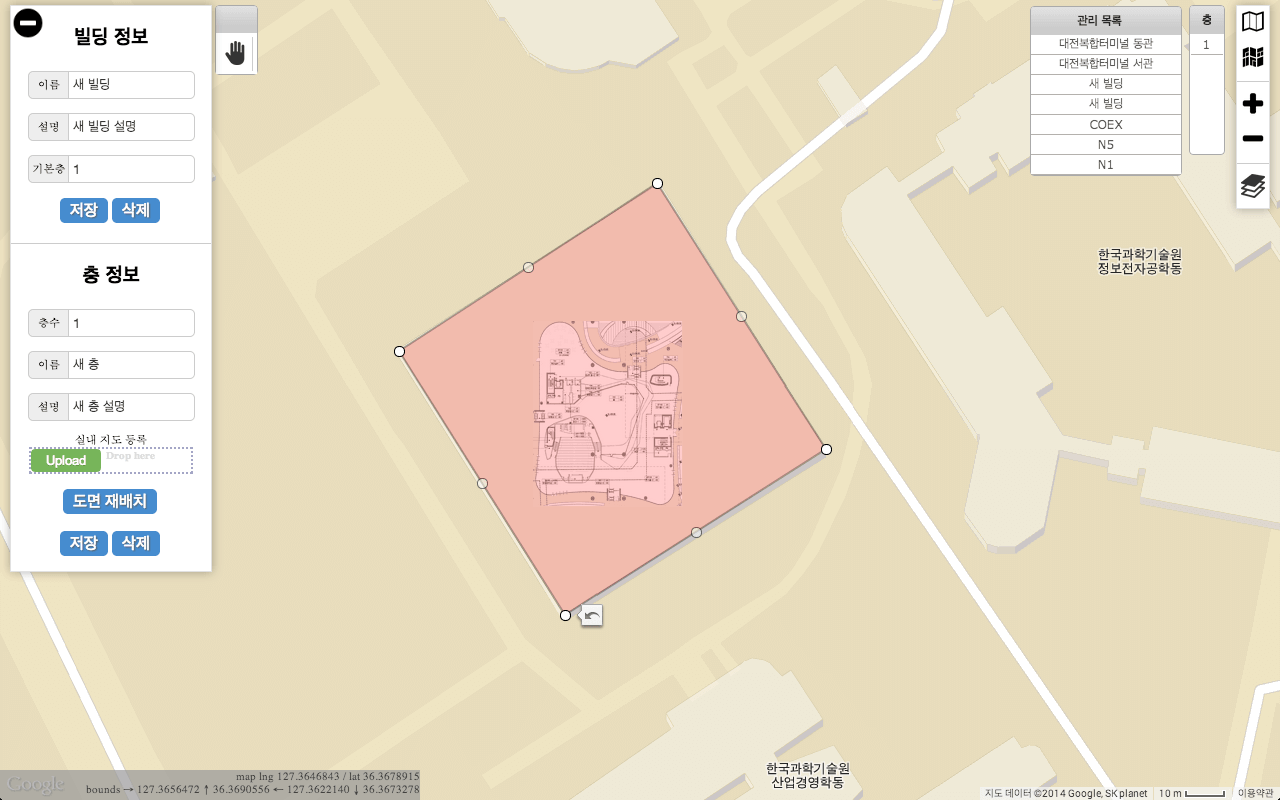
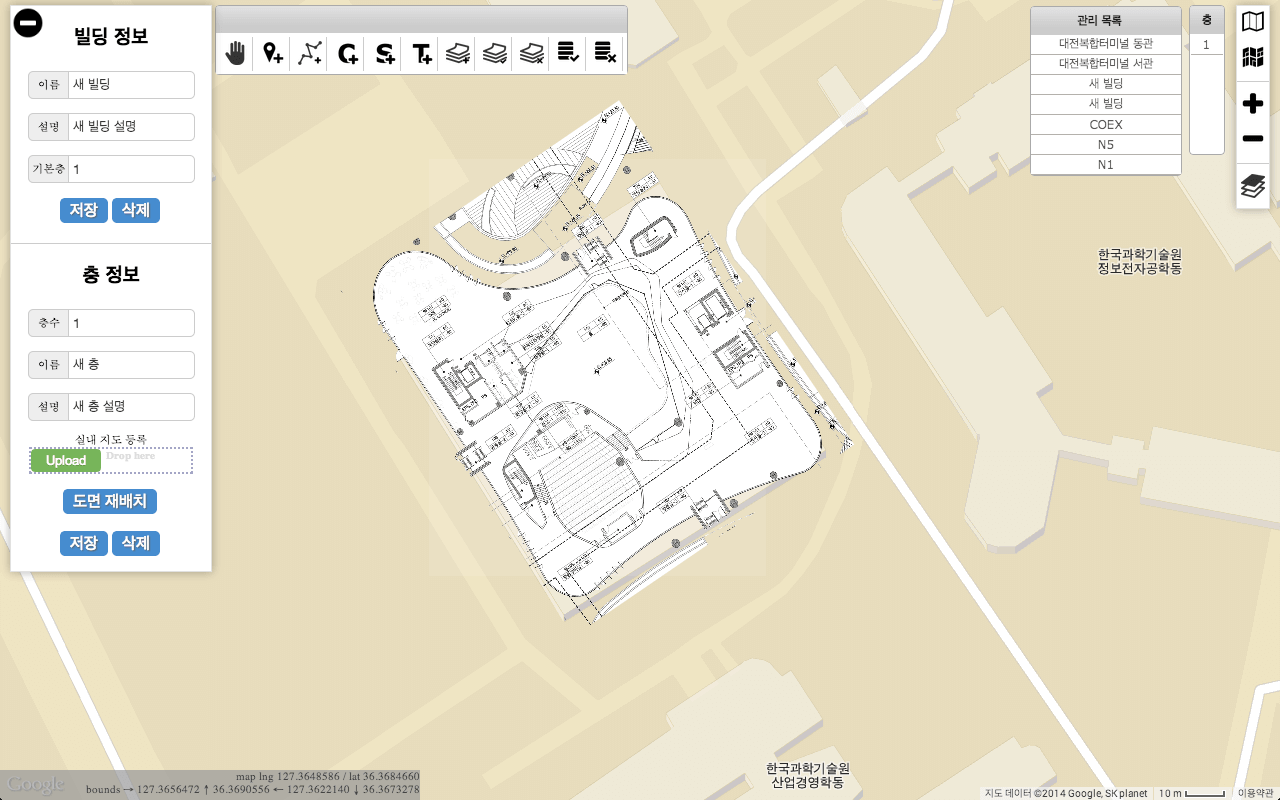
Log-in is required to acquire the full access to the map construction tool. You are only allowed to see the constructed indoor maps by others but cannot change or add any buildings without a proper log-in task. Once you logged-in, you can launch the web-based map construction tool with the full access and move the map to the area in which you want to add a building. During the process, the search bar, located in the left-top corner of the screen, can be very helpful when you already know the address or the name of the building you want to add. It is recommended that the map should be moderately zoomed into the building for the more convenient building addition task (Figure 1). When you see the building on the map, move the mouse cursor in the area of the building and click the right-button. (Figure 2) You will be able to see “Add a building” on the context menu. Once you click on the menu, a new layer (building layer) is appeared on the screen. Click “Modify a building” button on the top toolbar to get into building modification mode (Figure 3). In the building modification mode, you can freely drag around the vertices of the appeared layer to align the layer onto the outlines of the actual building. (Figure 4~5)


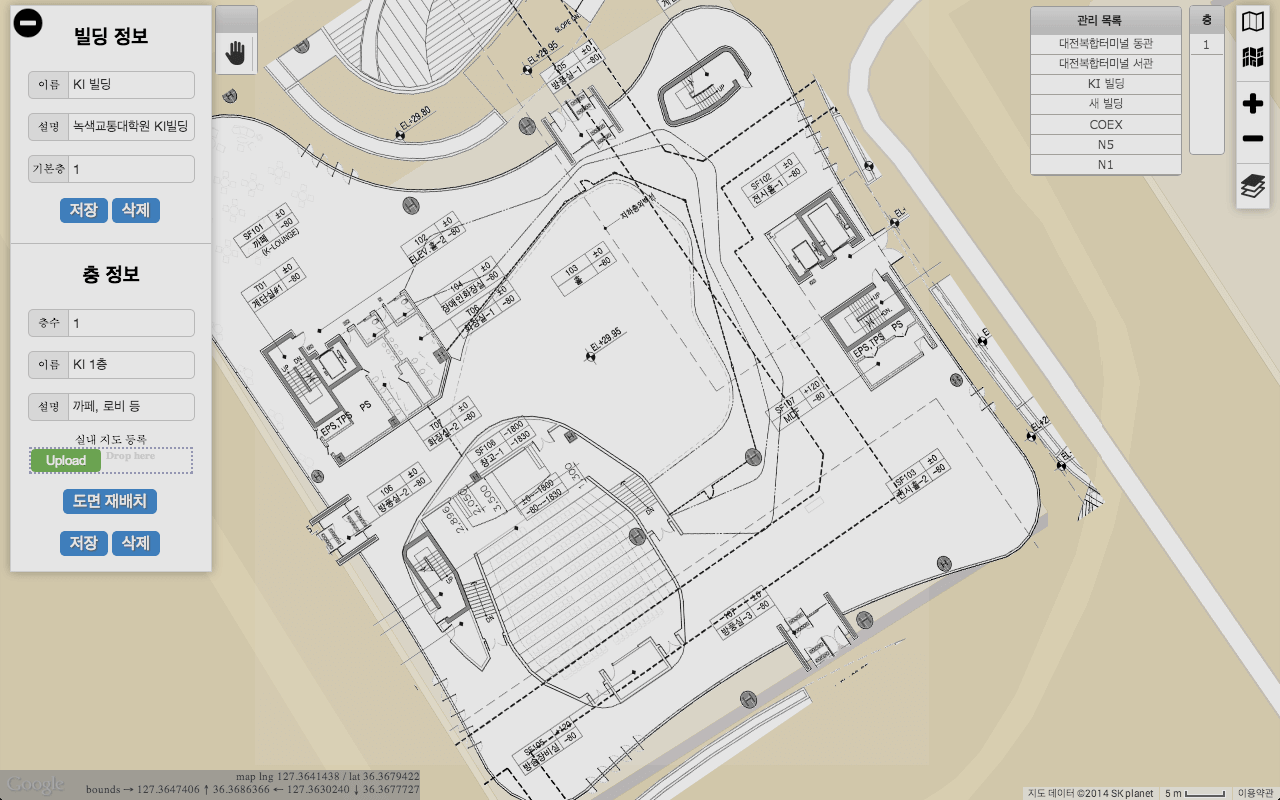
Adding Floor Maps
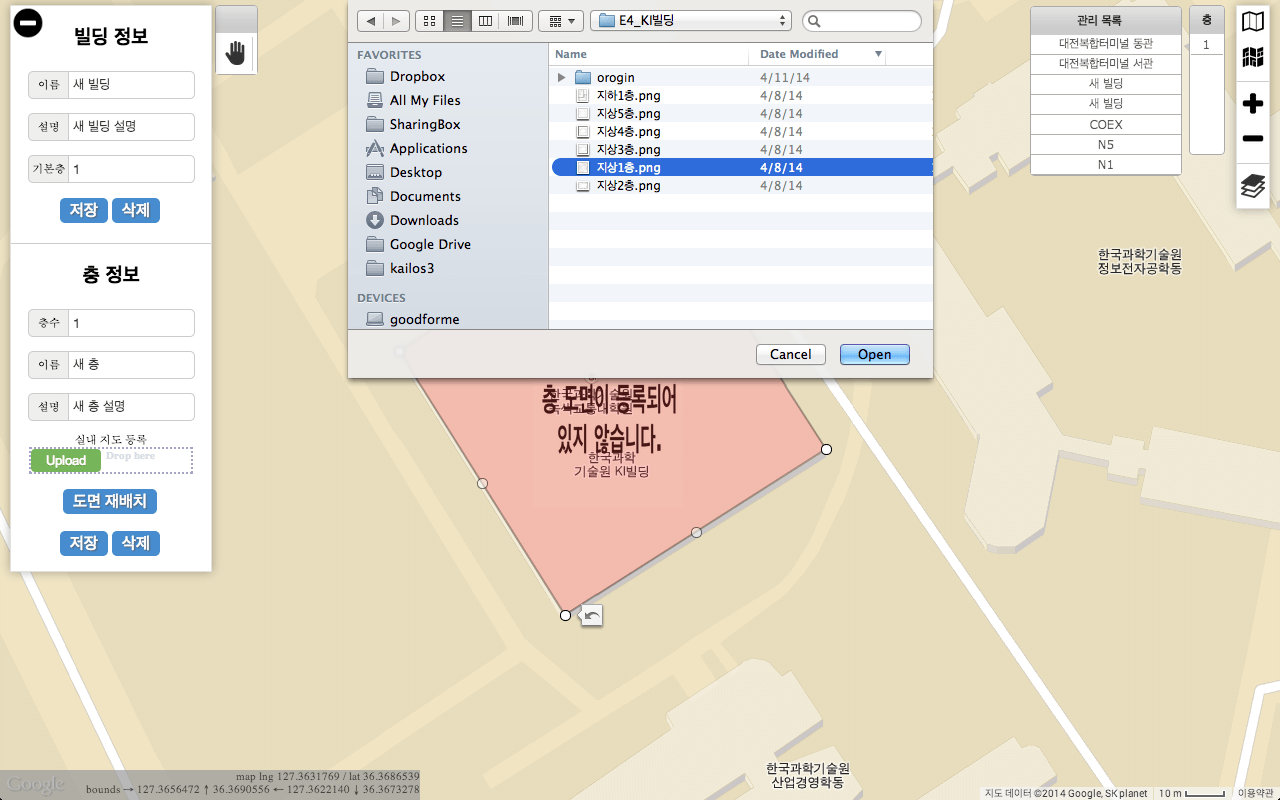
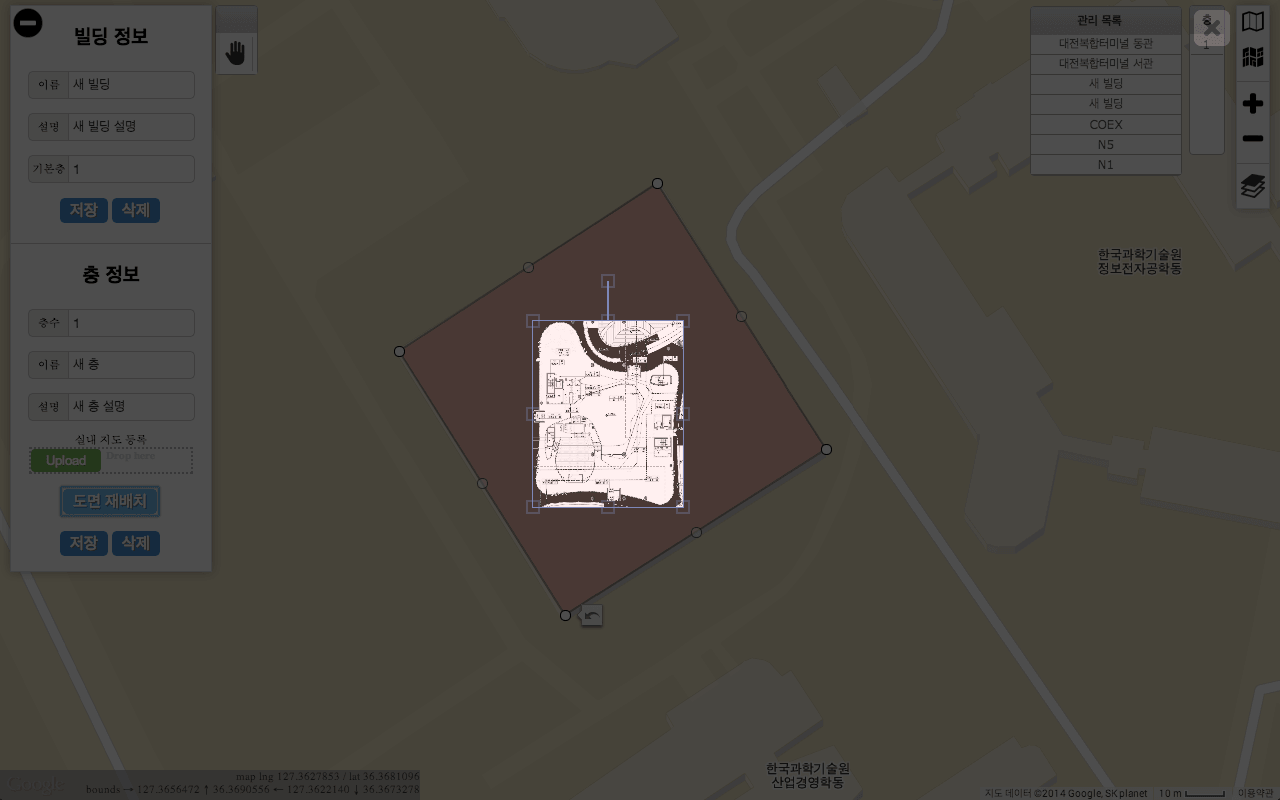
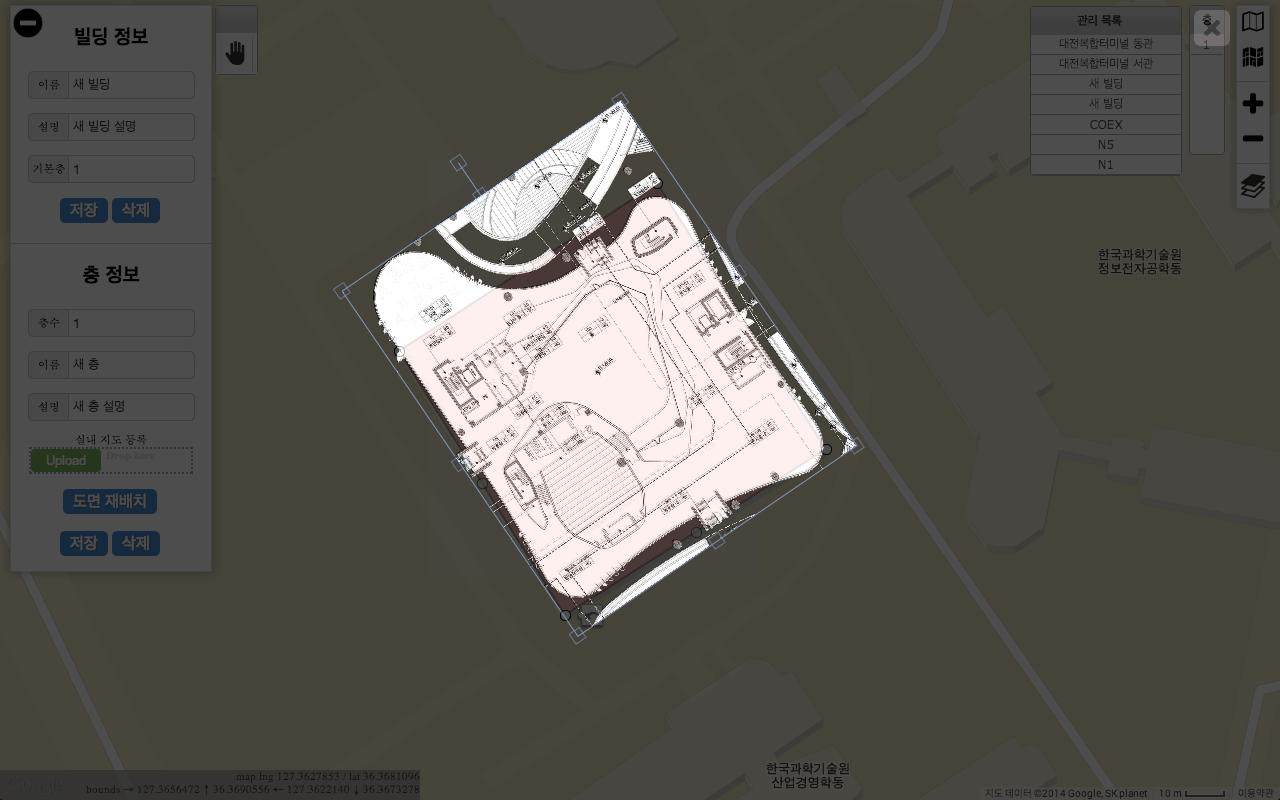
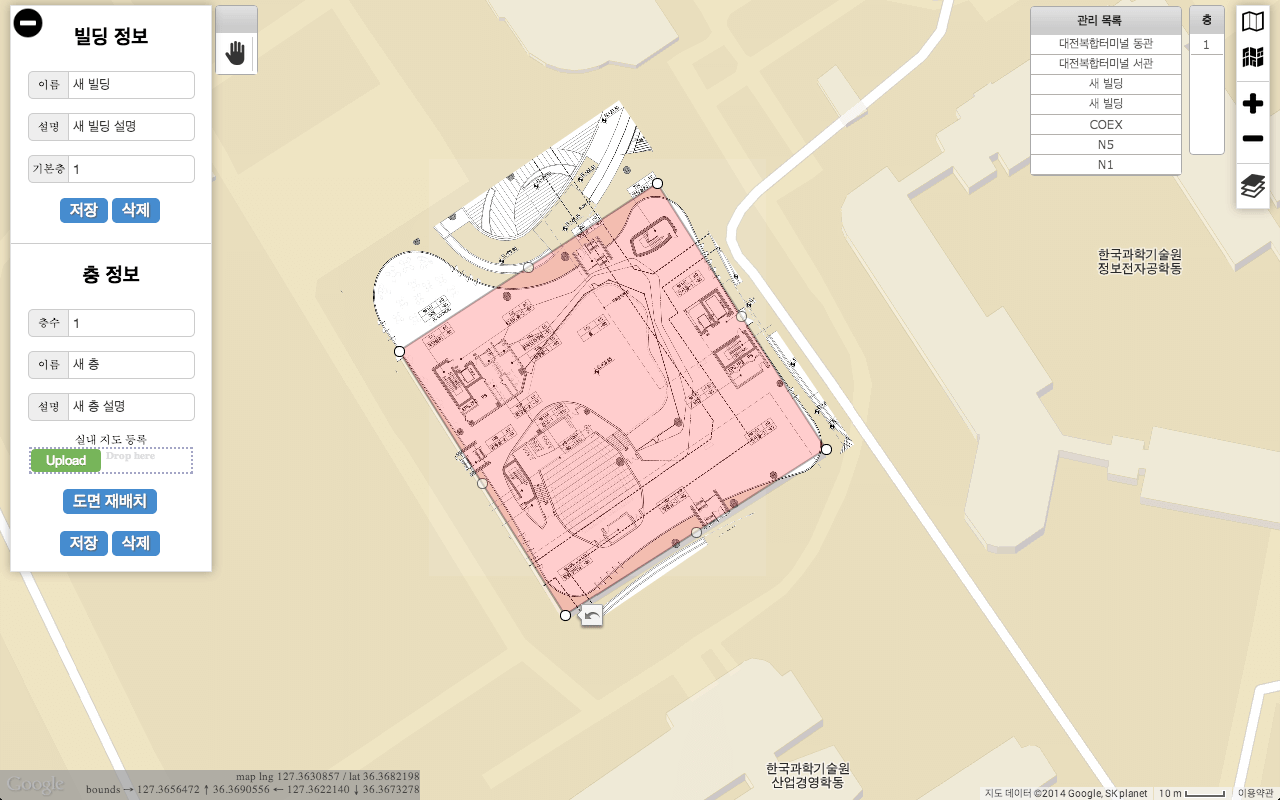
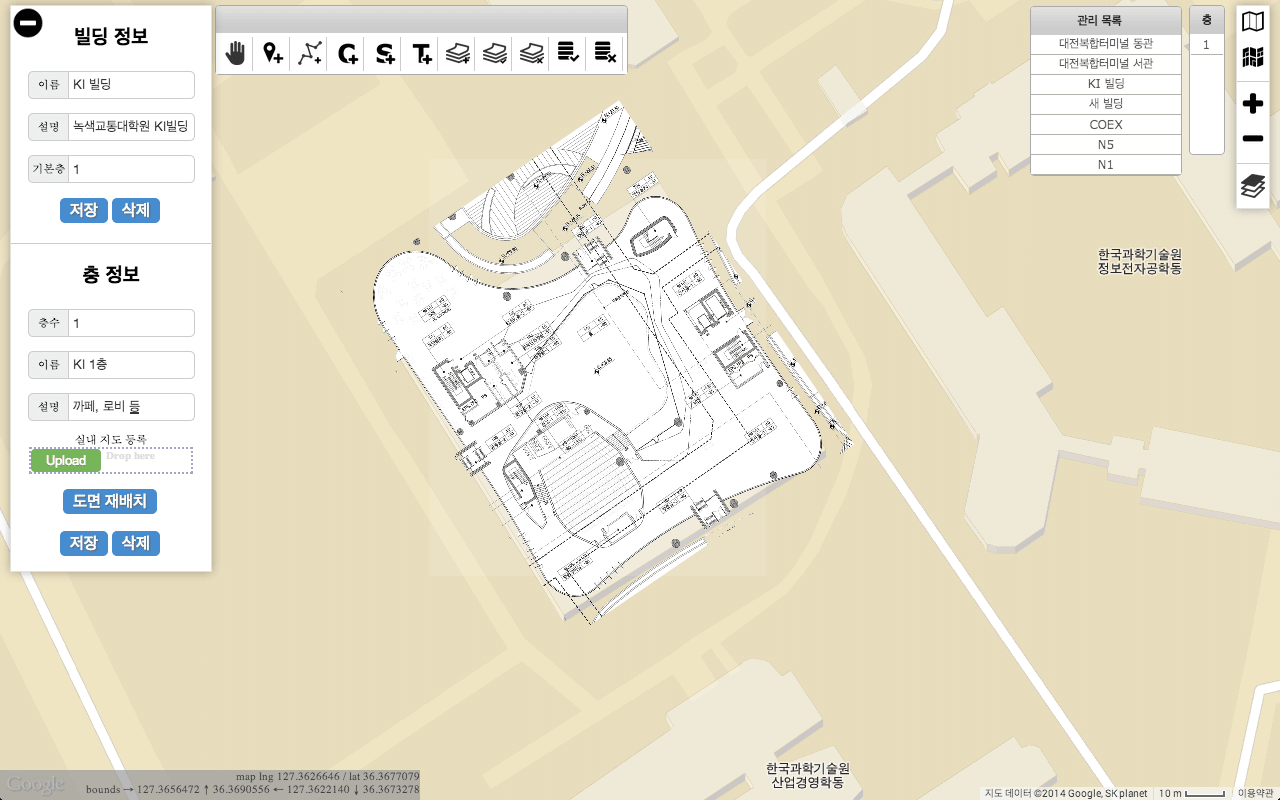
Click “Upload” button to upload the prepared indoor map image of the targeted floor onto the KAILOS server. (Figure 6) Then, click “Align a map image” button to align the uploaded map to the geographic coordinates (Figure 8). Once the alignment is completed, you should provide the names for the building and floor. Finally, click “Save” button to finish the floor map addition task (Figure 12)
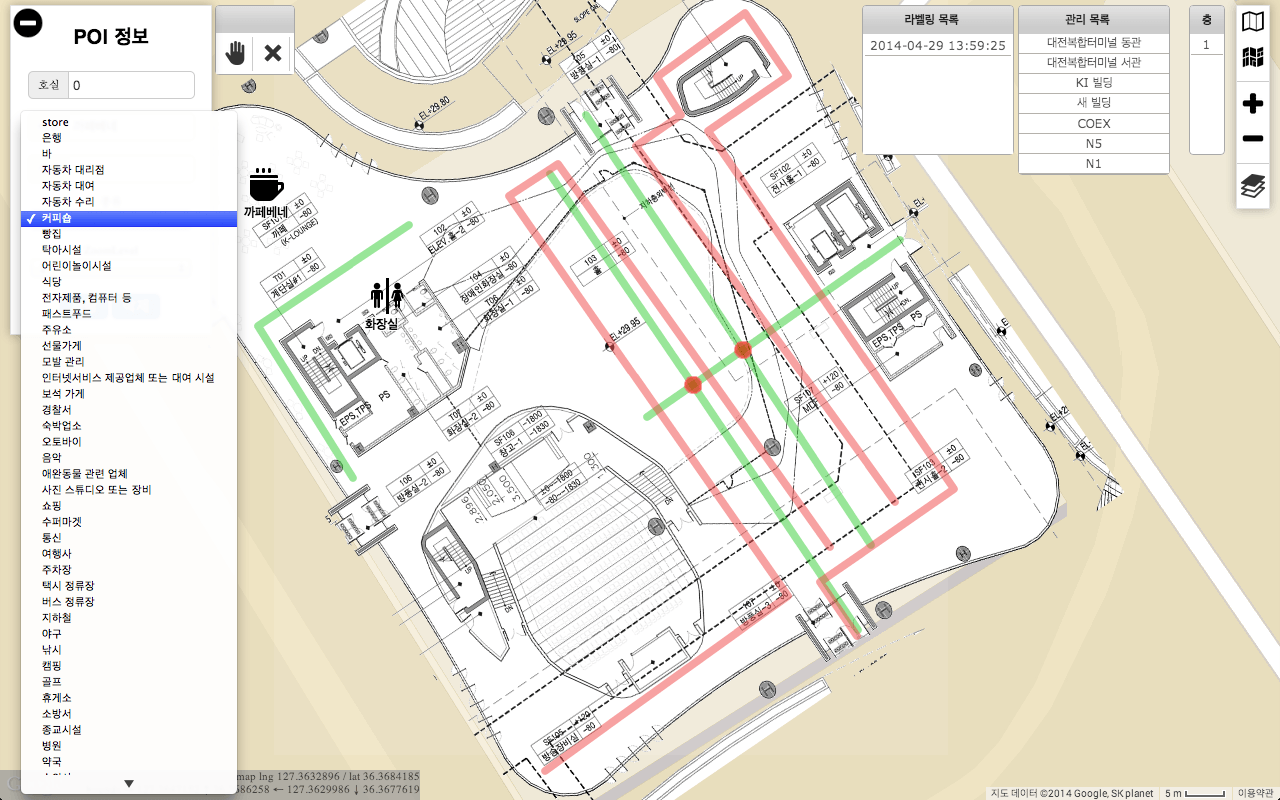
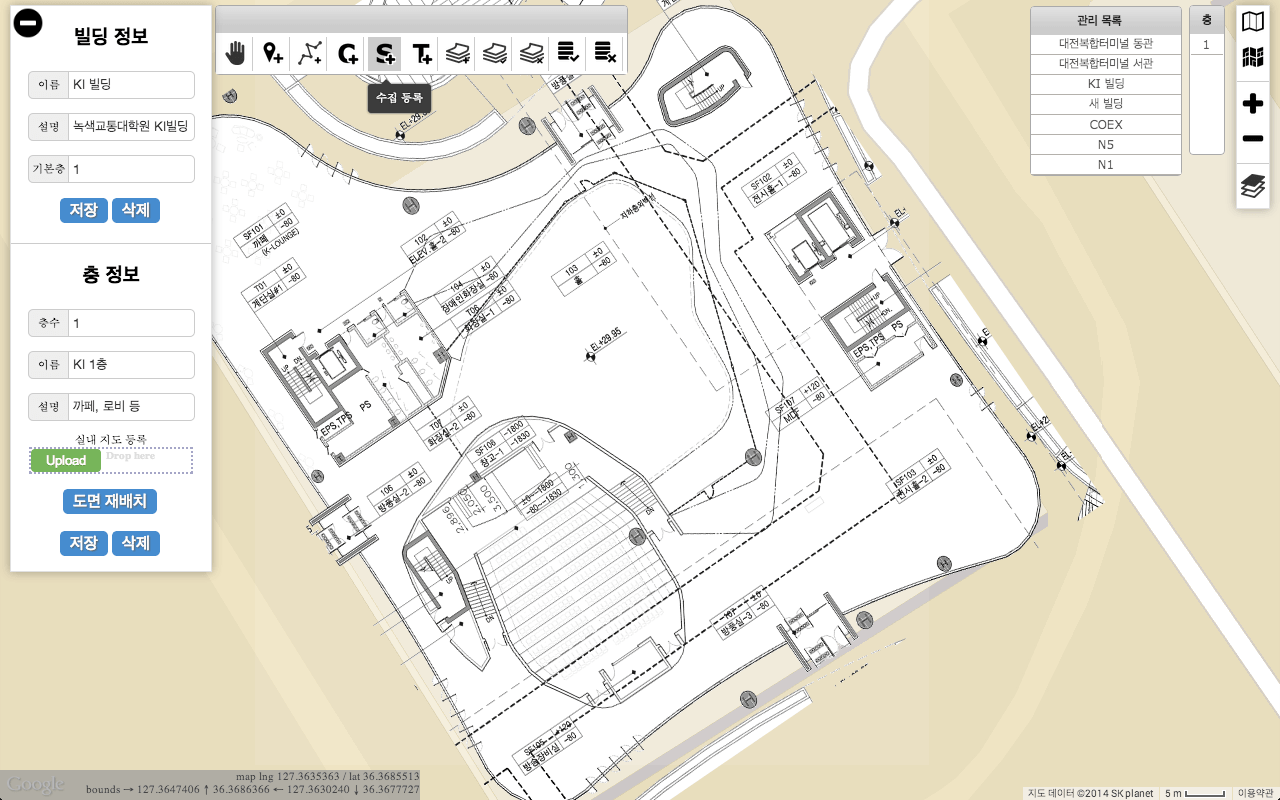
Registration of POI
Now, this is the process of registration of point of interest. The point of interest is useful place being a destination when providing indoor navigation. For example, the point of interest may include office, stair, toilet and so on. In order to register such places, you should click button![]() on the tool bar, and then you can click any point that you want to register on the map. Then, you can see the input box dialog about that place (Figure 7). In this input box, feed information about place, and click save button
on the tool bar, and then you can click any point that you want to register on the map. Then, you can see the input box dialog about that place (Figure 7). In this input box, feed information about place, and click save button![]() . Finally, this is done by clicking button on the tool box (Figure 8). Through similar way mentioned above, you can register any other place information on the map.
. Finally, this is done by clicking button on the tool box (Figure 8). Through similar way mentioned above, you can register any other place information on the map.
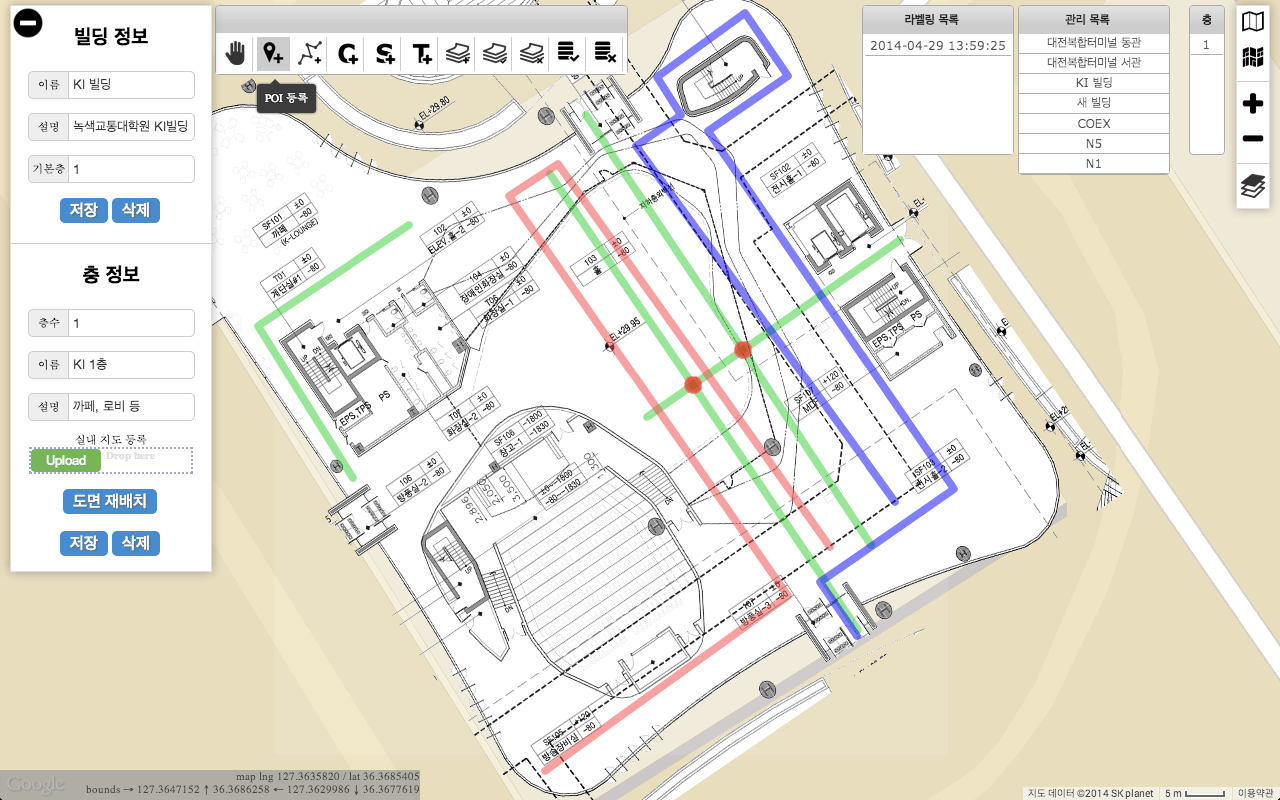
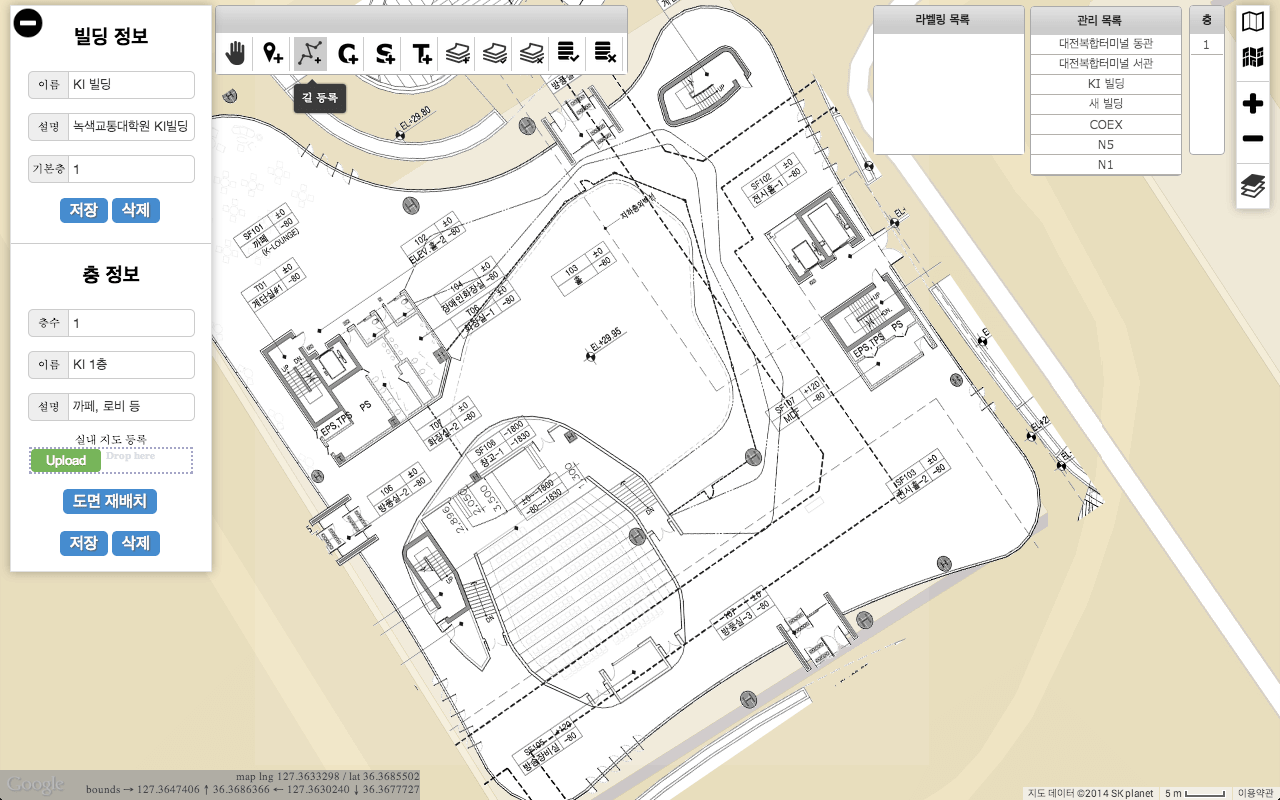
Registration of Roads
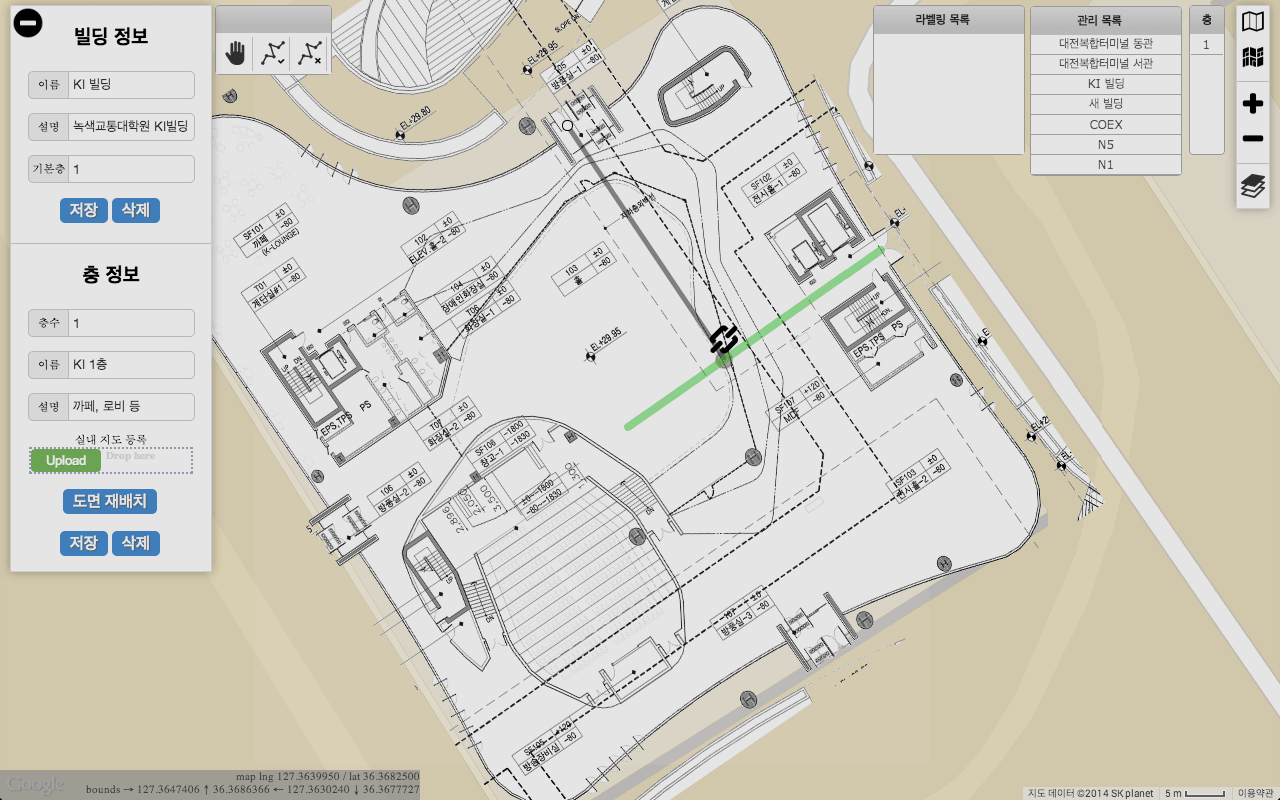
The road means possible movement path of user who use the indoor location based application. Once you register road information, you can offer more precise location using the KAILOS map matching technique when you develop an application (optional). To register road network, click button ![]() on the tool bar, and draw a road on the map by clicking point that you want to make a road on the map. And a road is created by double clicking end point of road (Figure 9). After creating a road, click button
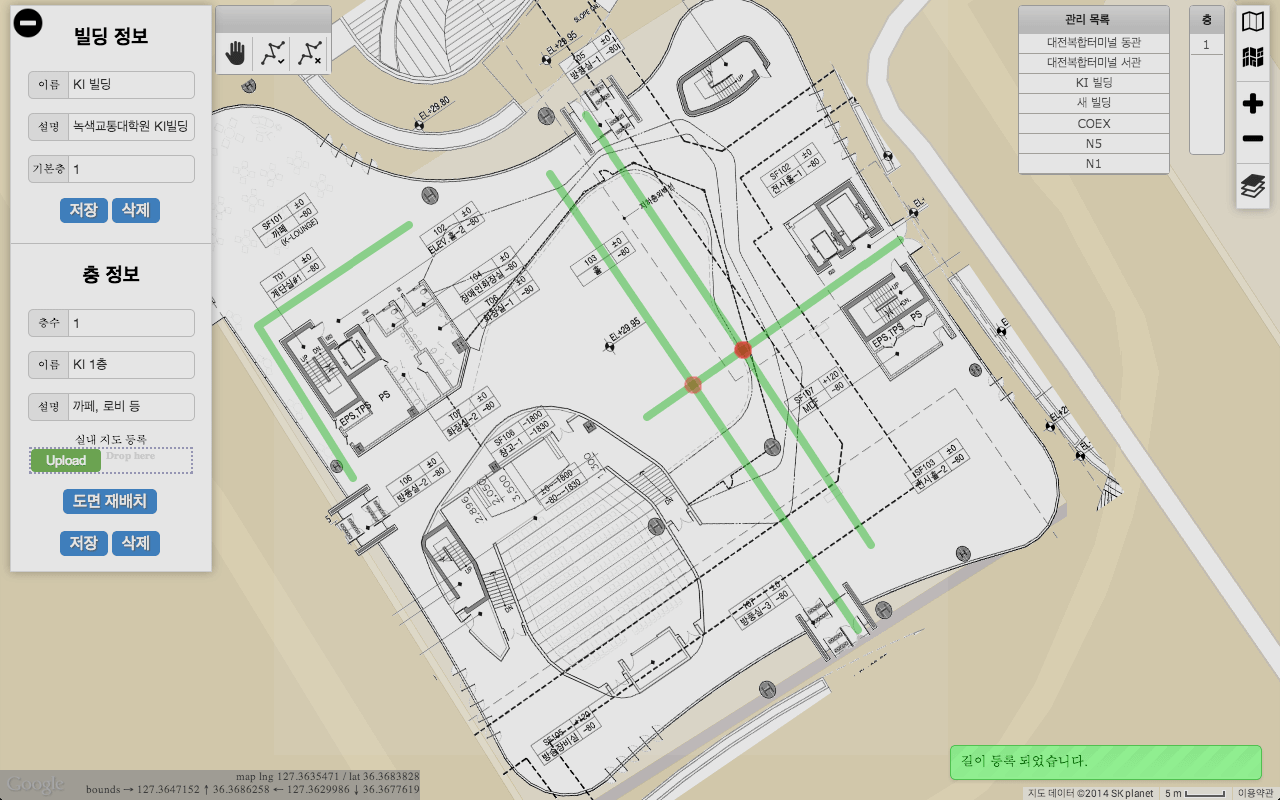
on the tool bar, and draw a road on the map by clicking point that you want to make a road on the map. And a road is created by double clicking end point of road (Figure 9). After creating a road, click button ![]() to exit. If you want to add new road in existing road, click button
to exit. If you want to add new road in existing road, click button![]() , and do same way mentioned above. The intersection of road is represented as red dot (Figure 10).
, and do same way mentioned above. The intersection of road is represented as red dot (Figure 10).
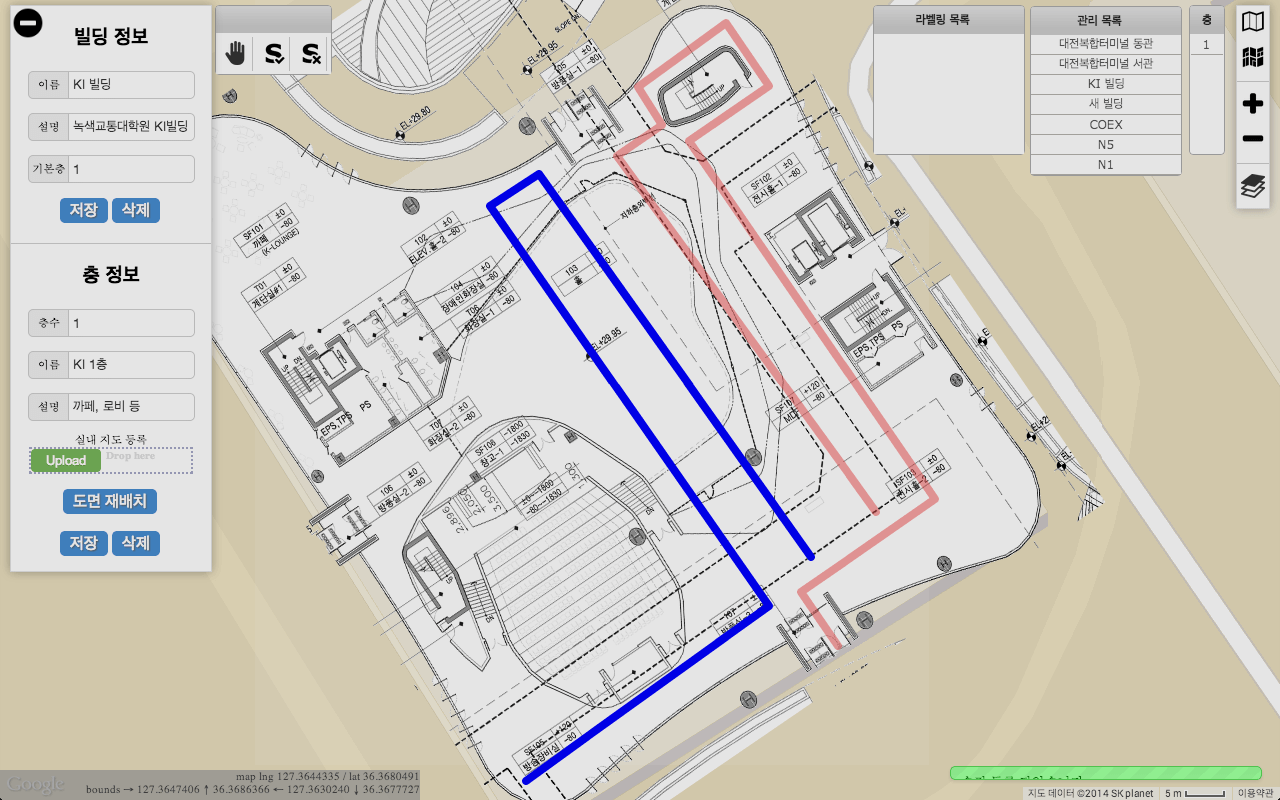
Planning of Signal Collection
In order to collect signals, signal collection paths should be planned in advance. The planned paths are used by the collectors collecting signals in the next collection step. For the planning of signal collection, click the button![]() on the right side of canvas, then a layer, which allows users to hide or show some components, is popped out. Click the canceling button of 'Road' box, then the road networks disappear (Picture 11). Survey lines to collect signals can be drawn at that state. Click the button
on the right side of canvas, then a layer, which allows users to hide or show some components, is popped out. Click the canceling button of 'Road' box, then the road networks disappear (Picture 11). Survey lines to collect signals can be drawn at that state. Click the button![]() on the center of canvas, and then click the start point of a survey line. The survey line is drawn from a start point to zero or more middle turning points and to an end point. The lines connecting the clicked points compose a survey line. In order to mark the end point, the point should be double-clicked and then the a survey line is registered as a planned path. The planning is over by clicking button
on the center of canvas, and then click the start point of a survey line. The survey line is drawn from a start point to zero or more middle turning points and to an end point. The lines connecting the clicked points compose a survey line. In order to mark the end point, the point should be double-clicked and then the a survey line is registered as a planned path. The planning is over by clicking button![]() . Once the signal collection path is planned, the signal collection activity can be started using the 'data collecting tool'. The tool supports the collection activity with the registered survey plan.
. Once the signal collection path is planned, the signal collection activity can be started using the 'data collecting tool'. The tool supports the collection activity with the registered survey plan.

Signal Collection
Signal collection tool install & run
The 'data collecting tool' should be installed a collection device where Android OS is running.
Requirements.
- The following is the least required setup environment.
- A device equipped with a wireless communication module.
- A device equipped with an SD card.
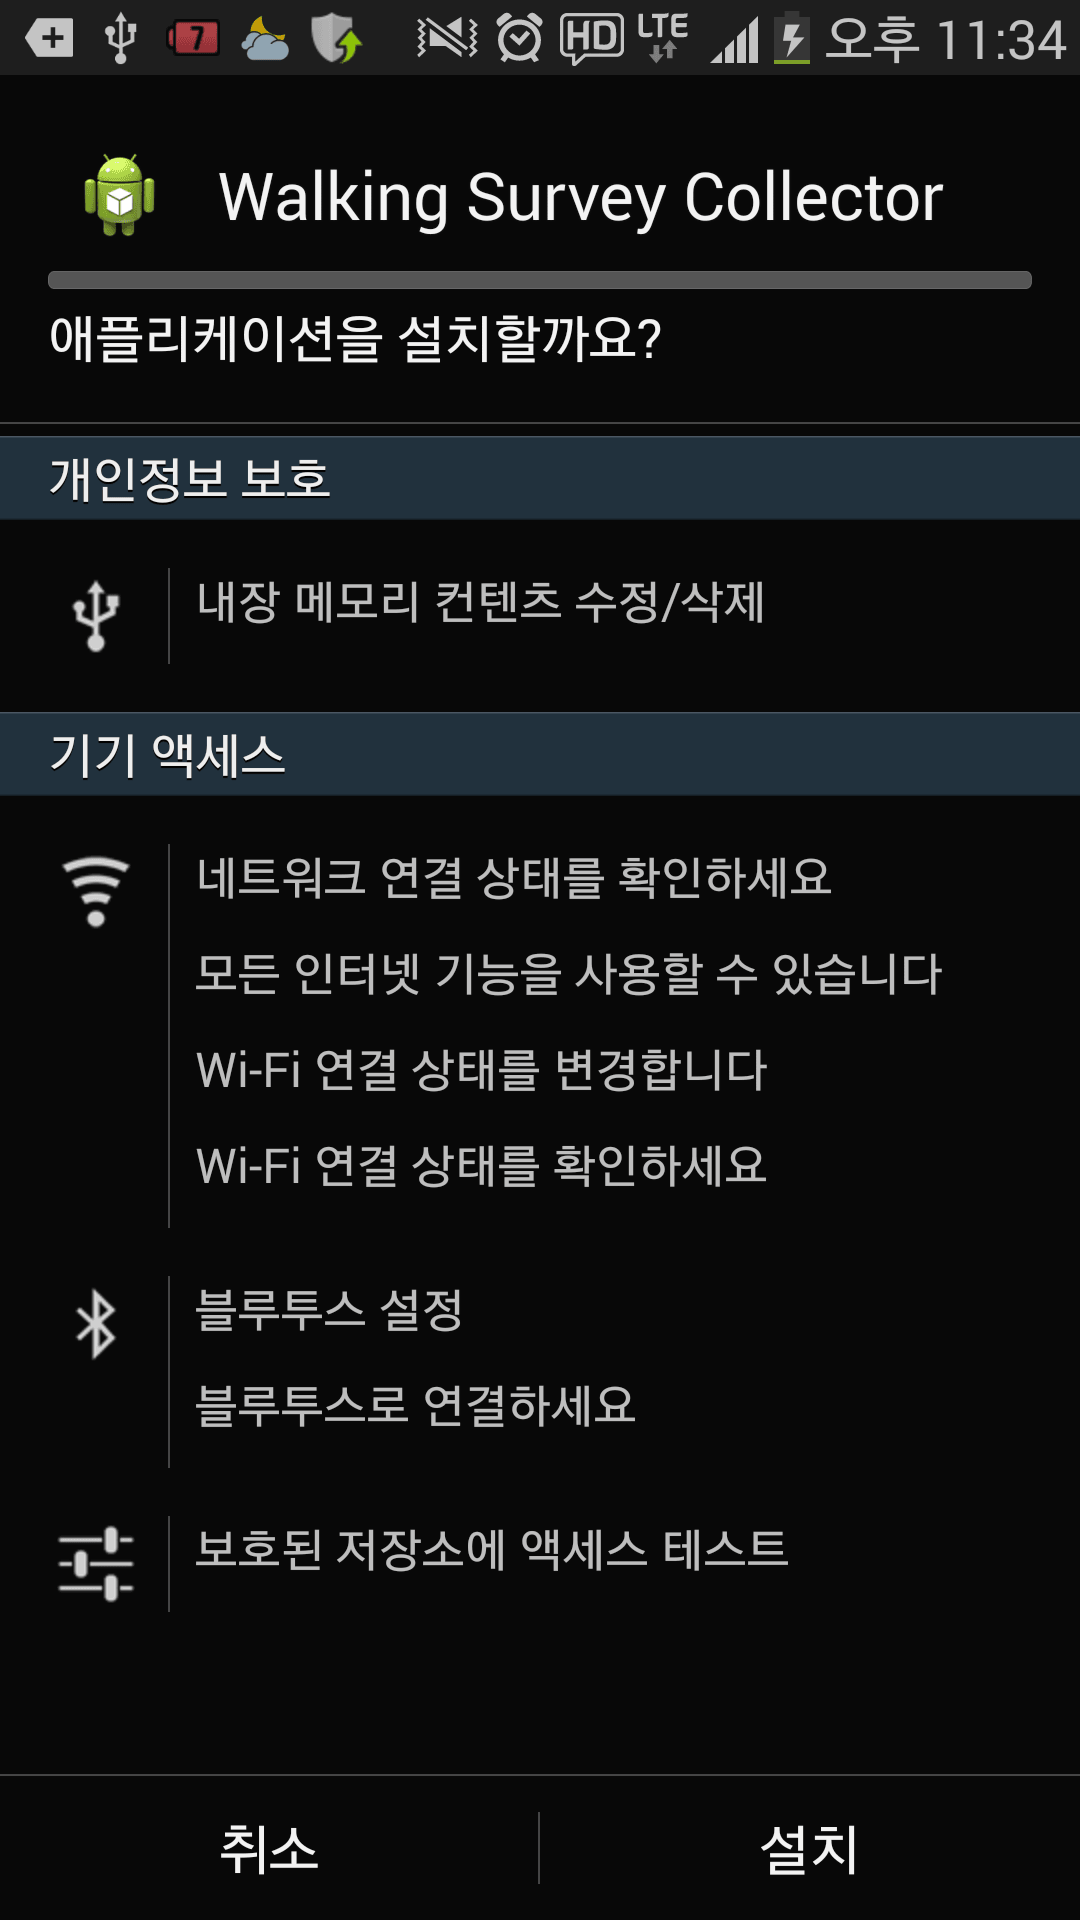
Installing procedure
- Copy 'WSTool.apk' file into a directory of your mobile device
- Execute the .apk file using Explorer Application
- Click 'Install' button to install the tool
- Run the installed application
Log inshould be made for one to use the data collecting tool.
Attention! The login id and password should be same as those used to register survey lines in the previous step. If the login is successfully made, the tool will login automatically whenever you run the tool. The logout can be done by clicking 'menu' button -> 'logout' button.
Configuration of the tool
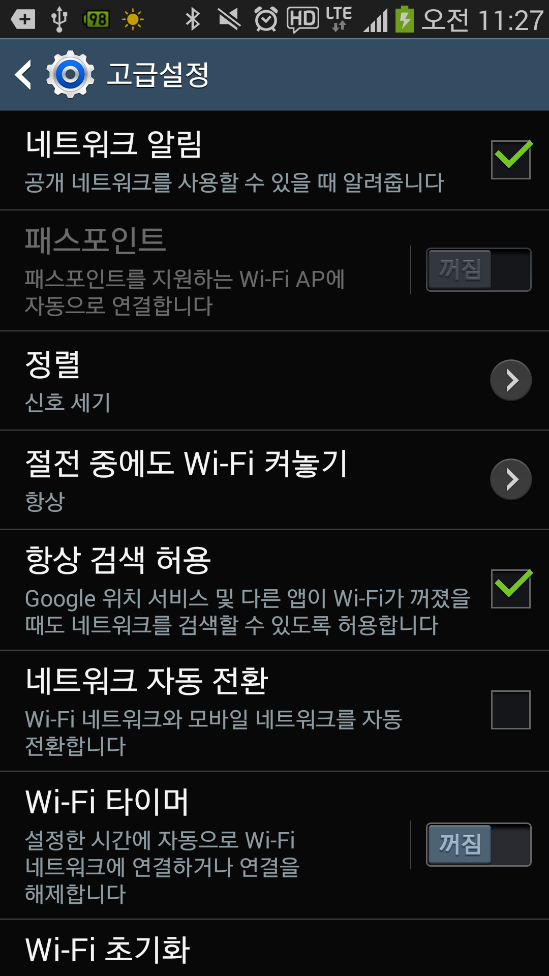
For the configuration of the tool, at the home screen of your device, click ‘menu’ button ‘Settings’. Click Wi-Fi item in the ‘Connection’ tab. In the ‘Wi-Fi’ settings, click ‘menu’ button ‘Advanced’. Then you can see the screen in the below. Set on the ‘Always allow scanning’.
Main view
'SURVEY LIST' Tab


This tab lists floors that are registered by the web based AP construction tool. If the 'Load survey floors' button is clicked, registered floors by the web tool with your log-in Id are loaded, and shows them in the form of list to a mobile device. When touch a floor on which you want to collect data signal is clicked, the collecting tool loads the registered survey lines of the clicked floor, stores the plan and the survey lines of the floor on mobile devices, and displays the floor plan with the survey lines.
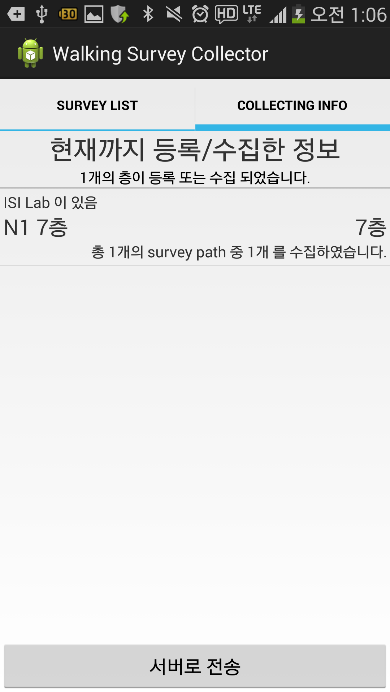
'COLLECTING INFO' Tab

The floors that are visible in the 'COLLECTING INFO' tab are the selected or touched ones from the 'SURVEY LIST' tab. You can consider that information of all floors that appear in the 'COLLECTING INFO' tab are stored in your device. So, you can access the information of any floor in the 'COLLECTING INFO' tab even though your device is not connected to internet (i.e. WiFi, 3G, 4G). The reason of why a connectivity to the internet is important is explained in ‘Collecting Data' 'Start collecting' Attention 2.
The 'COLLECTING INFO' tab provides a brief collecting information of each floor such as how many survey lines a floor has or how many surveyed lines it have been collected with. The tab also provides the function with which a user can upload collected data to the server. It can be done by touching 'Send data' button. The floors that are shown in the 'COLLECTING INFO' tab can be accessed without the connection to the Internet. A floor be shown in the tab by selecting or touching a floor in which you want to collect data in the 'SURVEY LIST' tab.
Data collection
Data collection is made in 4 steps.
* In the collecting view, you can transfer, scale up/down, and rotate the floor plan.
1st step : Check the survey plan of the floor

In this step, the floor plan is checked along with survey lines. Many survey lines can be planned for a floor.
2nd step : Be ready to collect data and check the direction of survey lines.
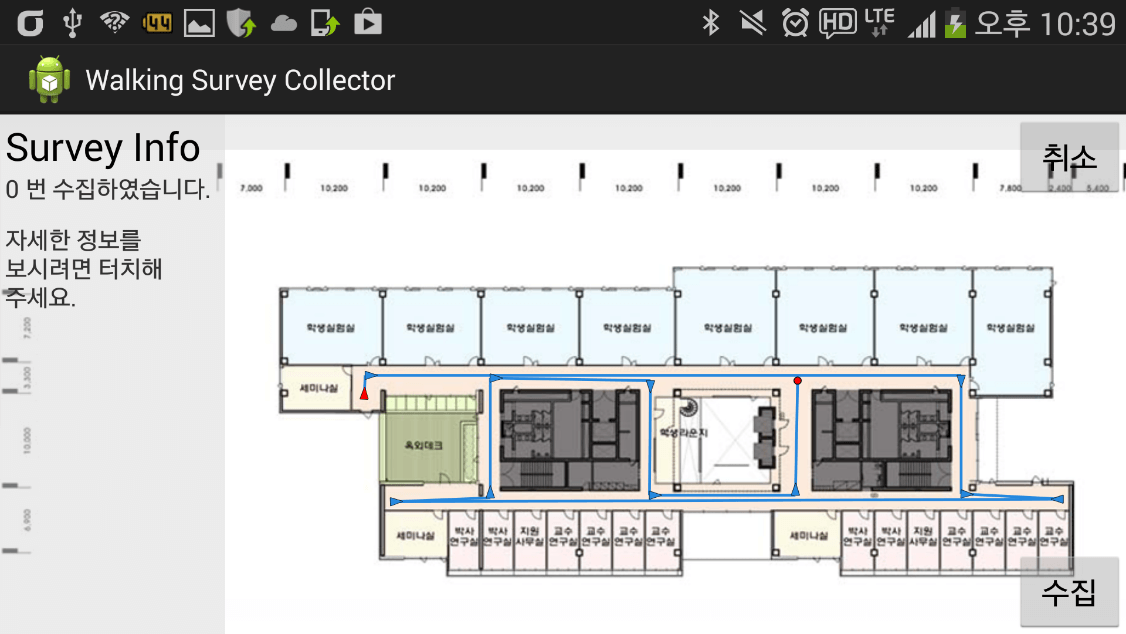
Select one of the survey lines, then the color of the selected line changes to blue color with circular or triangular marks. The red triangular mark denotes the start point, and the red circular mark denotes the end point.
Survey Info : The view provides a brief information with how many times the selected survey lines were collected. If you want to see more specific information, you can see it by touching the view. More detailed contents about 'Survey info' can be viewed by 'Do you want to see more specific collected information?'.
'Collect' and ‘Cancel’ buttons : If the 'Collect' button is clicked, collection is started. If the 'Cancel' button is clicked, the collection device returns to the previous stage.
3rd step : Start collecting
If the checking of the survey lines is finished, then move to the start point of the planned path. On there, click 'Collect' button, and then walk following the survey lines with comfortable and regular steps. If you arrive at the end point (red circular point), click 'Complete collecting' button.
Attention 1
While a user collects data signal, the device should be held in front of the pit of collector's belly naturally. If the device is shaken during walking, it may affects to the quality of the collected data.
Attention 2
If the device has the list of WiFi profiles, they should be deleted before starting the collection. Otherwise, while you are collecting data, your device may be connected to an access point which is one of the profiles. The connection may disturb to collect data accurately.
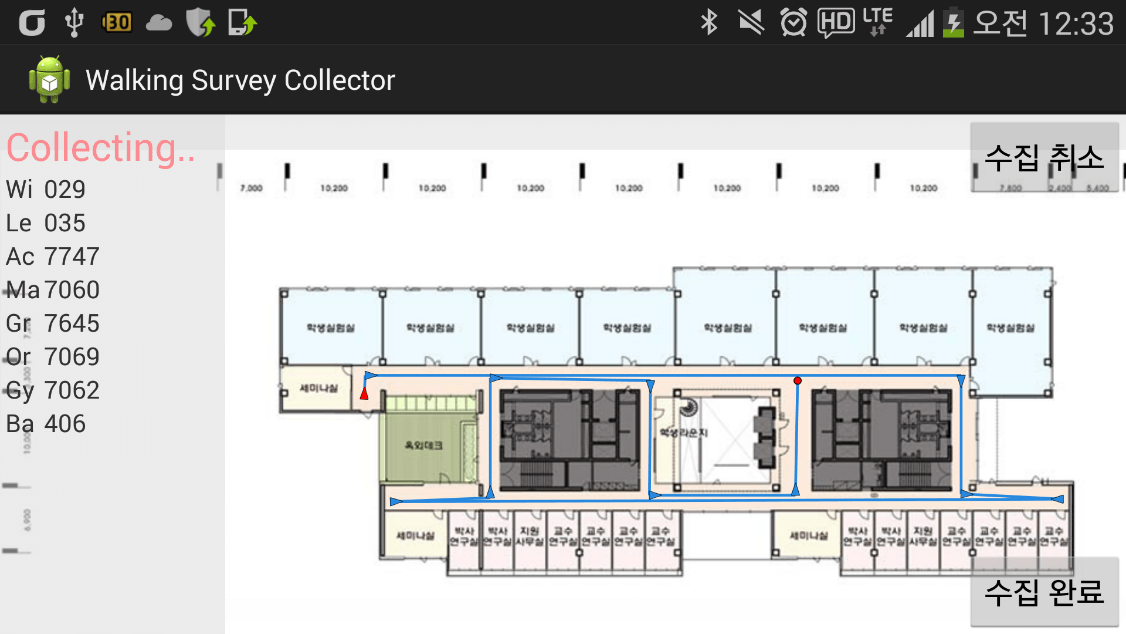
Start collecting WiFi data with consideration of the attentions. The collector collects not only WiFi signals but also BLE signals and sensing data from various sensors such as 3-axis accelerometer, gyroscope, compass, ets. The collection state can be monitored in the 'Collecting..' view on the spot. It is possible to transfer, scale up/down, or rotate during collection. If the collectors are are confused to see the floor plan correctly, they can handle the image view by scale up/down, or rotate.
'Cancel collecting' and Complete collecting' buttons : If 'Cancel collecting' button is clicked, the collecting is canceled. If 'Complete collecting' button is clicked, the tool stops collection and stores the collected data in the device.
4th step : Save
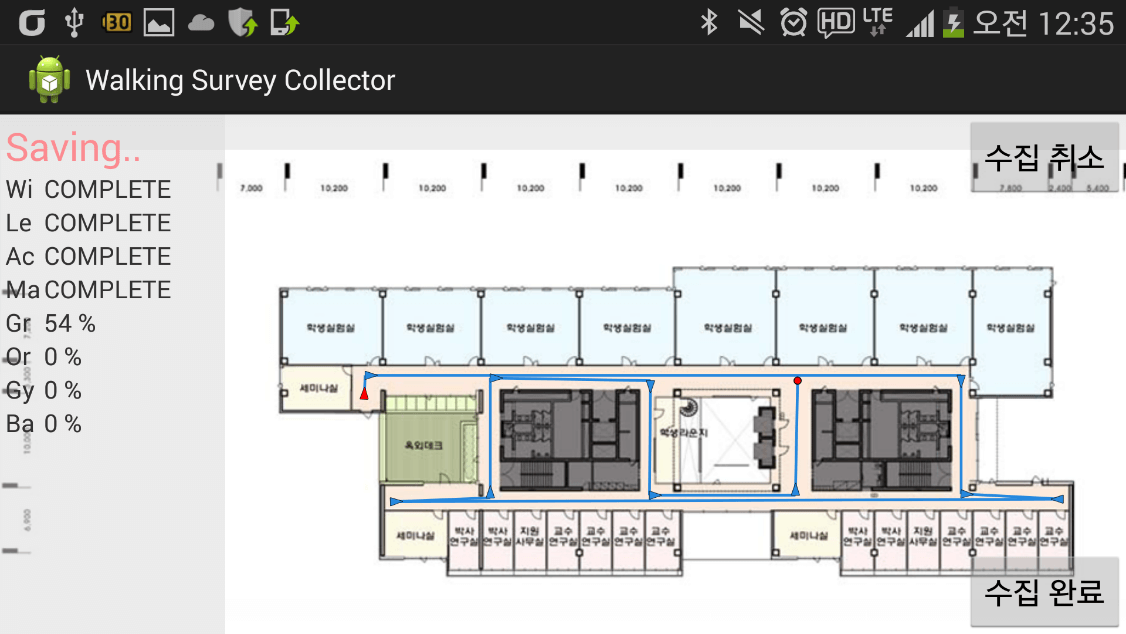
After the collection of data in one floor is finished, the collected data should be stored in the device. The storing of each data like WiFi, BLE, or sensing data from sensors are displayed on the 'Saving..' view. The storing can be confirmed by checking the 'COMPLETE" message.
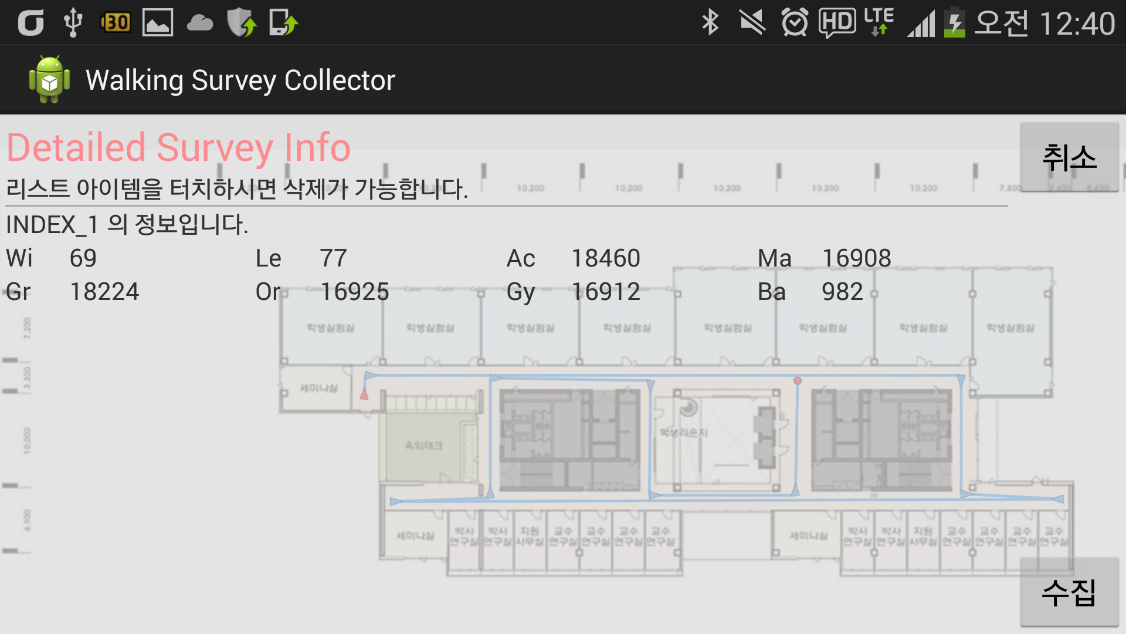
'Do you want to see more detailed information on the collected data?'
For more detailed information on the collected WiFi, BLE or sensing data from various sensors, click 'Survey Info' tab. Various information on each survey, such as how many times the survey lines have been collected, and the number of WiFi fingerprints of each survey is provided. For the deletion of the surveyed data, just click the delete button after selecting the item in the list.
When does the user remove collected data?
Sometimes the collectors need to delete the collected data. For example, the collectors may click 'Complete collecting' button and stores the collected data before arriving at the end point. Or, the collectors may have collected the data too fast, and as a result too small amount of WiFi data may be collected. In these cases, collectors have to delete the data collected already.
Uploading the collected data to KAILOS server
Send collected data to the server
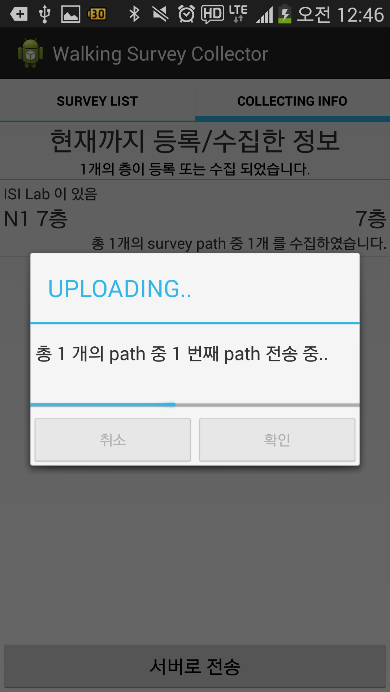
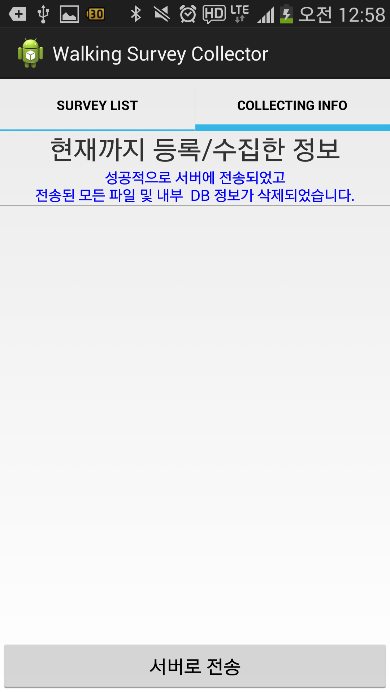
When collecting data and storing of the collected data are finished, the collected data should be uploaded into KAILOS server. Click the 'Send data' button in the 'COLLECTING INFO' tab. Once the uploading is successfully made, all the stored data is deleted from the device with a success message.
Completion of Radio Map Construction
Once the collected data is sent to the KAILOS server, "Labeling Task" should be done to construct a radio map in the server. In the "Labeling Task", the collected data are analyzed and a radio map is constructed using the data. Location tagging for collected fingerprints are done in this task. The "Labeling Task" can be completed by simple instructions in the below. First, click the "Survey Plan" button. Lastly, select "Labeling" in labeling window.

Test Navigation
Once all the steps have been finished to "Radio Map Constuction Step", current location can be tracked using "KAILOS positioning API".For this, an Andorid-based test navigation app is provided. It shows the estimated location which is calculated by "KAILOS positioning API" on the map you added earlier.
* System Requirements for Test Navigation
- Mobile devices with Android 4.0 or higher.
- Embedded WLAN module.
- 10MB of free space.
* Installation Guide
- Get KAILOS test navigation app from this page.
- 1) Click (Here) to download an Application Package (APK) file.
- 2) Copy the downloaded APK file into any directory in a device.
- 3) Use any file explorer (Such Astro file explorer) to execute the copied APK file.
- 4) Click "Install" button to start the installation.
KAILOS test navigation app manual
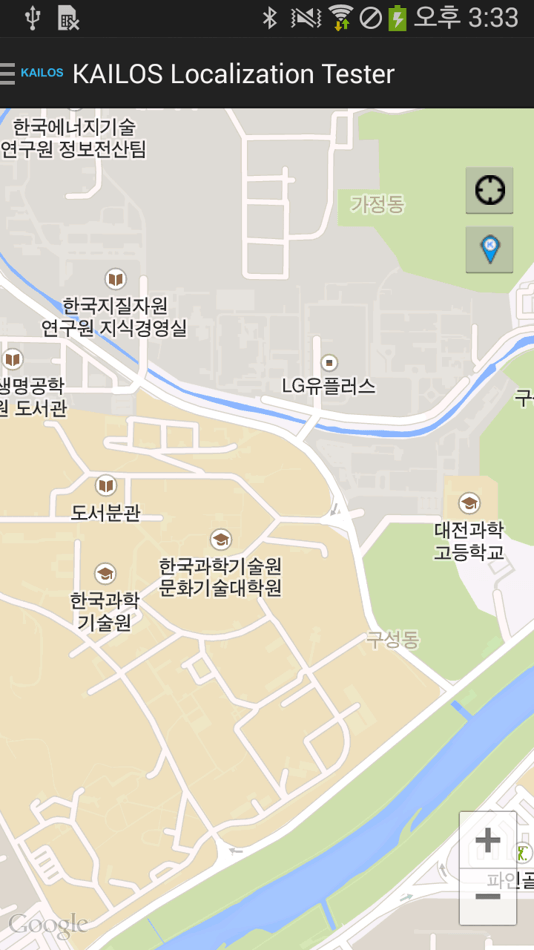
KAILO test navigation app provides a very intuitive user interface as it has only a few simple functions.
This part may be skipped for one who are already familiar with the use of any other mobile map applications :)
The map is displayed like the scrrenshot#1 below when the navigation app is invoked.
There are two buttons on the top-right corner of the map.
The first button of the top  starts or stops location tracking.
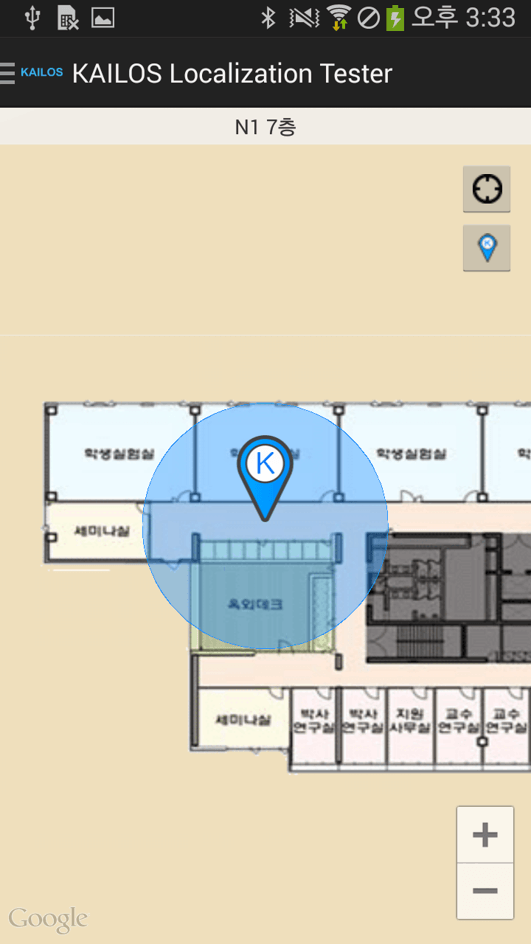
When the button is clicked, the estimated location is marked on the map as shown in the sccrenshot#2 below.
The second button
starts or stops location tracking.
When the button is clicked, the estimated location is marked on the map as shown in the sccrenshot#2 below.
The second button moves the map to the estimated location.
The map moves to the current location and be zoomed as shown in the screenshot#3 when the second button is clicked.
Also, this page can be accessed by clicking "Help" button on the menu.
The menu is popped out like in Screenshot#4 when the menu button is clicked.
moves the map to the estimated location.
The map moves to the current location and be zoomed as shown in the screenshot#3 when the second button is clicked.
Also, this page can be accessed by clicking "Help" button on the menu.
The menu is popped out like in Screenshot#4 when the menu button is clicked.


STEP2: Application Development Utilizing KAILOS API
KAILOS provide RESTFul API for develop service.
Position API
Estimate Location
- URL: /api/location
- Method: POST
- Parameters
- data: (JSON)
-
{ "wifi": [ // Fingerprint (list of AP Scans) { "bssid": "00:26:66:2f:43:60", // BSSID "rss": -80, // RSS "ssid": "Welcome-KAIST" // SSID (Optional) }, ... ], "ble": [ // BLE Fingerprint (scan result while a second) { "bssid": "00:26:66:2f:43:61", "rss": -85, "device_name": "myPhone" // (Optional) }, ... ], "gps": [ { "lng": 100.0, // Longitude "lat": 100.0, // Latitude "acc": 0.0, // Accuracy "alt": 0.0, // Altitude "bear": 0.0, // Bearing "elap": 0.0, // Elapsed Realtime Nanos "speed": 0.0, // Speed "time": 0.0 // Time }, ... ] } - Response
-
{
    "lnglat": {                     // GeoJSON format
        type: "Point",              // GeoJSON Point Type
        coordinate: [100.0, 100.0]  // GeoJSON coordinate: [lng,lat] (WGS-84)
    },
    "alt": 45.0000,                 // Altitude (Optional)
    "level": 7,                     // Level Number
    "floorID": 9,                   // Floor Map ID
    "bd": "N1",                     // Building Code (Optional)
    "err": 6.7                      // Position Error (Optional)
}
Update Survey Data
- URL: /api/db/updateSurveyData
- Method: POST
- Parameters
- data: (JSON)
-
{ "wifiList": [ { "apList":[ { "ssid": "isiLab", "bssid": "00:26:66:2f:43:60", "rssi":-89 }, ... ], "lng": 127.36534260538609, "lat": 36.374168514955834, "level": 7, // Buliding floor "bd": 'N1', // Buliding name "floorID" : 9 // Unique floor ID }, ... ] } - Response
-
- HTTP Status Code
MAP API
Retrieve Floor Map
- URL: /api/map/getFloorMaps
- Method: POST
- Parameters
- data: (JSON)
-
{ "queryType": "NEAREST_ENTIRE", // Query Type [NEAREST_ENTIRE | NEAREST_REPRESENTATIVE | FLOOR_ID] "lng": "100.0", // Longitude (Used for "NEAREST_ENTIRE", "NEAREST_REPRESENTATIVE") "lat": "101.0", // Latitude (Used for "NEAREST_ENTIRE", "NEAREST_REPRESENTATIVE") "floorID": "1234" // Floor ID (Used for "FLOOR_ID") } - Response
-
{
    "floormaps": [
        {
            "objID":14,
            "neLat":36.374393463134766,
            "neLng":127.36409759521484,
            "swLat":36.373573303222656,
            "swLng":127.36292266845703,
            "angle":0,
            "areaID":1,
            "buildingID":15,
            "floorID":12,
            "category":"IMG",
            "memberID":1,
            "floorName":"N5 2F",
            "floorNumber":2,
            "buildingName":"N5 기초과학연구동",
            "floorNumberBase":2,
            "areaName":"KAIST 한국과학기술원",
            "imageURL":"uploads/1____1377087116.png"
        },
        ...
    ]
}
get POI
- URL: /api/map/directory
- Method: POST
- Parameters
- data: (JSON)
-
{ "queryType": "POI", // Query Type [POI] "keyword": "dongsoo" // Search Keyword } - Response
-
{
  "poi": [
    {
      "_id": "525cc557fd4be8314bc5951d",
      "floorId": "525cc3f8fd4be8314bc594e7",
      "name": {
        "kr": "한동수",
        "en": "Dongsoo Han"
      },
      "category": "prof",
      "roomNumber": "814",
      "visibleZoomStart": 19,
      "visibleZoomEnd": 30,
      "geometry": {
        "type": "POINT",
        "coordinates": [
          [
            127.3660891,
            36.3740404
          ]
        ]
      },
      "memberId": "1"
    },
    {
      "_id": "525cc557fd4be8314bc5952b",
      "floorId": "525cc3f8fd4be8314bc594e5",
      "name": {
        "kr": "한동수",
        "en": "Dongsoo Han"
      },
      "category": "prof",
      "roomNumber": "704",
      "visibleZoomStart": 19,
      "visibleZoomEnd": 30,
      "geometry": {
        "type": "POINT",
        "coordinates": [
          [
            127.365545,
            36.3740436
          ]
        ]
      },
      "memberId": "1"
    }
  ]
}
Route API
Get road network by floorId
- URL: /api/map/route
- Method: POST
- Parameters
- queryType: "GET_ROADS_BY_FLOORID"
- floorId: (STRING)
-
- queryType: "GET_ROADS_BY_FLOORID" - floorId: "525cc3f8fd4be8314bc594c3" - Response
-
{
  "road": [
    [
      [
        127.363031,
        36.37373,
        "525cc3f8fd4be8314bc594c3"
      ],
      [
        127.363031,
        36.37373,
        "525cc3f8fd4be8314bc594c9"
      ]
    ],
    [
      [
        127.363017,
        36.374319,
        "525cc3f8fd4be8314bc594c3"
      ],
      [
        127.363017,
        36.374319,
        "525cc3f8fd4be8314bc594ca"
      ]
    ],
    [
      [
        127.363018,
        36.37432,
        "525cc3f8fd4be8314bc594c3"
      ],
      [
        127.363018,
        36.37432,
        "525cc3f8fd4be8314bc594c9"
      ]
    ]
  ]
}
Find the shortest path
- URL: /api/map/route
- Method: POST
- Parameters
- queryType: "FIND_PATH"
- from: (STRING)
- to: (STRING)
-
- queryType: "FIND_PATH" - from: 127.3658898,36.3741702,525cc3f8fd4be8314bc594e7 - to: 127.3658872,36.3741724,525cc3f8fd4be8314bc594e7 - Response
-
{
  "path": [
    [
      127.3658872,
      36.3741724,
      "525cc3f8fd4be8314bc594e7"
    ],
    [
      127.3658872,
      36.3741238,
      "525cc3f8fd4be8314bc594e7"
    ],
    [
      127.3658872,
      36.3740968,
      "525cc3f8fd4be8314bc594e7"
    ],
    [
      127.3658858,
      36.3740579,
      "525cc3f8fd4be8314bc594e7"
    ],
    [
      127.3661031,
      36.3740557,
      "525cc3f8fd4be8314bc594e7"
    ],
    [
      127.3661031,
      36.3740795,
      "525cc3f8fd4be8314bc594e7"
    ],
    [
      127.3661031,
      36.3741724,
      "525cc3f8fd4be8314bc594e7"
    ]
  ]
}